Incorrect folding carton design, like missing a 0.6mm rollover allowance for 600μm board or miscalculating a 3mm bleed, causes costly production delays and compromised brand integrity. Technical precision is paramount.
This guide equips designers with essential knowledge, from applying ECMA Code structural standards and FDA/FTC compliance, to preparing print-ready PDF/X-4 files with ISO Coated v2 profiles. Let’s dive in!
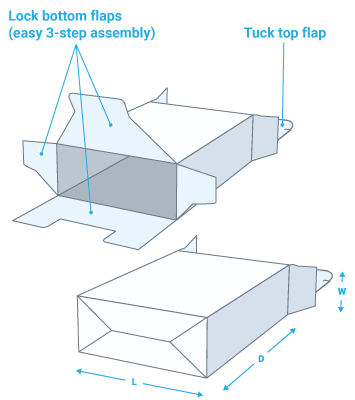
Understanding Dielines and Layouts
| Specification | Value/Description | Purpose/Impact |
|---|---|---|
| Cutting Lines | Solid lines | Defines the final shape of the carton. |
| Creasing/Folding Lines | Dashed lines | Indicates where the carton will fold. |
| Perforation Lines | Dotted lines | For tear-off sections or easy opening. |
| Packaging Bleed | 3 mm (e.g., PaperWorks: 3.2 mm) | Prevents unprinted edges after cutting. |
| Artwork/Type Safety Margins | 3 mm inside die line (min 2 mm clearance) | Keeps text and graphics from being cut or creased. |
| Rollover Allowance | 0.6 mm (up to 600 µm); 0.8 mm (over 600 µm) | Ensures smooth folding of thicker boards. |
| Dimensional Error Tolerance | 1 mm | Critical for proper assembly or closure. |
Understanding the precise technical requirements for folding carton dielines is fundamental to successful packaging production. Dielines act as the structural blueprint, guiding the manufacturing process from cutting to folding.
Defining Dielines and Standard Markings
Dielines are essential for creating functional and aesthetically pleasing packaging. They precisely outline every cut, fold, and detail necessary for a carton’s structure.
- Dielines define the structural blueprint for folding cartons.
- Tools like ArtiosCAD and Adobe Illustrator are often used to build production dielines.
- Standard line coding uses solid lines for cutting, dashed for creasing/folding, and dotted for perforations.
- Designers commonly use separate layers or colors for glue zones and knock-outs to ensure clarity.
Precision and Tolerances in Dieline Geometry
Achieving functional and high-quality packaging depends on strict adherence to dieline tolerances. Slight deviations can significantly impact the final product’s assembly and appearance, which is why precision is a cornerstone of Baili Paper Packaging’s production philosophy.
Artwork, Bleed, and Safety Margins

Artwork bleed ensures your design extends beyond the finished cut line, preventing unsightly unprinted edges after the die-cutting process. Safety margins are vital interior areas that protect essential text and graphics from being cut, folded, or obscured by glue.
Together, these elements account for manufacturing variations, guaranteeing a polished and professional final folding carton without defects.
Achieving high-quality folding carton packaging relies on precise artwork setup. Understanding bleed and safety margins is fundamental for designers to prevent common printing issues.
These crucial elements ensure that your brand’s packaging looks clean and professional, despite the small variances that occur in manufacturing processes.
Defining Bleed and Critical Safety Zones
Bleed and safety zones are design non-negotiables. They serve as buffers against the slight shifts that can happen during packaging production, protecting your artwork’s integrity.
Ignoring these zones can lead to packaging with white edges where color should be, or important details being cut off.
Implementing Industry-Standard Measurements
Adhering to industry-standard measurements for bleed and safety margins simplifies the design process and prevents costly errors. These specific dimensions are established to ensure consistency and quality across all printed packaging.
Following these guidelines helps create print-ready files that Baili Paper Packaging can process efficiently, leading to excellent final products.
Elevate Your Brand with Custom & Sustainable Folding Cartons
Coating and Finishing File Setup
Proper file setup for coatings and finishes involves defining specific application areas and detailing functional requirements like gloss and rub resistance.
Specify material types such as aqueous coatings, UV coatings, or film laminates. This precision prevents manufacturing issues and ensures packaging meets performance standards.
Preparing design files for coatings and finishes requires careful attention to detail. Accurate setup ensures that the final packaging achieves the desired aesthetic and functional properties.
It also prevents common manufacturing challenges, leading to a smoother production process and high-quality results.
Defining Coating Areas and Functional Requirements
Clearly marking coating and finish areas in your design files is essential. This helps manufacturers understand exactly where and how different applications should be applied.
You also need to specify the performance targets your packaging needs to meet, ensuring durability and effectiveness.
- Designate specific areas for coatings and finishes within artwork files, distinguishing between full flood and spot applications.
- Ensure coating specifications avoid glue flaps and critical fold lines to prevent interference with creasing or adhesive wet-out.
- Specify functional performance targets, including required coefficient of friction (COF), rub resistance, slip resistance, and grease/water resistance.
- Account for film thickness, which typically ranges from 0.5–2.0 mil (12.7–50.8 µm) for polyethylene layers, in dieline adjustments.
Specifying Finish Types and Regulatory Compliance
Choosing the right coating or laminate is crucial for both appearance and function. Your files should clearly detail the finish types and any necessary technical or regulatory information.
Baili Paper Packaging excels at applying various finishing effects, ensuring your packaging stands out while meeting all required standards.
- Utilize separate, named layers in design files for different finishes such as aqueous coatings, UV coatings, and film laminates.
- Specify coating chemistries including aqueous (water-based) coatings, UV coatings (gloss/matte), conventional varnish, barrier aqueous, or film laminates (e.g., polypropylene, nylon, PET).
- Indicate desired surface finishes: matte, gloss, or ‘mirror pocket’ gloss, as commercially standard grades.
- Include requirements for FDA compliance for direct or indirect food contact where applicable, noting that poly-coating resins can be USFDA-approved.
- Consider manufacturing constraints, such as maximum web widths of up to 103 inches (2616 mm) for custom coated/laminated board lines.
Practical Tips to Optimize Manufacturing
Optimizing folding carton manufacturing in 2026 involves designing for high-speed equipment, specifying materials precisely, and leveraging production efficiencies. Focus on standardizing carton dimensions, ensuring robust crease integrity, and calibrating board caliper.
You should also consider plant-level improvements like lean layouts and advanced automation for consistent quality and faster lead times.
To streamline your production process and reduce manufacturing costs for folding cartons, strategic design choices and material specifications are essential. Focusing on these areas helps ensure smoother operations and faster lead times.
Designing for Efficient Production Flows
Design decisions directly impact manufacturing speed and waste reduction on modern equipment. Crafting your folding carton designs with production efficiency in mind can significantly streamline the entire process.
- Align carton formats and board specifications with modern web-fed platen die cutters. These machines operate at speeds up to 25,000 impressions per hour in 2026, demanding precise material handling.
- Design within standard carton size windows, such as 100–1010 mm. This approach supports quick job changes and aims for makeready times around 15 minutes for repeat orders, boosting plant efficiency.
- Prioritize crease quality, bending resistance, and dust-free cutting in your designs. This minimizes rework and prevents costly stoppages on packing lines, ensuring consistent output.
Creating Print-Ready Files
Creating print-ready files for folding cartons means following industry standards for 2026. This includes using PDF/X‑1a or PDF/X‑4 formats, strictly CMYK and spot colors, and maintaining high image resolution.
Precise dieline management, correct bleed, and safety margins are also essential to ensure accurate production and quality results.
| Category | Requirement | Specification |
|---|---|---|
| **File Format** | Preferred Standards | PDF/X‑1a (v1.3) or PDF/X‑4 (v1.6) |
| **Color Management** | Color Space | CMYK + Spot Colors (Exclude all RGB) |
| Print Profile | ISO Coated v2 / FOGRA39 | |
| **Image Resolution** | Raster Images | Minimum 300 dpi (at 100% size) |
| Rasterized Text | Recommended 600 ppi | |
| **Structural Elements** | Bleed | 3–5 mm (approx. 1/8″ or 3 mm minimum) |
| Safety Margin (Text/Art) | Minimum 2 mm inside dieline | |
| Safety Margin (Complex Folds) | 1/4″ clearance from knives and scores | |
| Dieline Placement | Dedicated ‘Die’ layer, set to overprint, non-printing | |
| Rollover Allowance | 0.6 mm (board caliper ≤ 600 μm), 0.8 mm (board caliper > 600 μm) | |
| Barcode Quiet Zones | At least 10 times the width of the narrowest bar |
Essential File Format and Color Standards
The foundation of any print-ready file rests on its format and color setup. Correctly preparing these elements ensures consistent and predictable results during the prepress process.
Baili Paper Packaging works with these industry-standard specifications to produce high-quality output.
Precision in Artwork and Structural Elements
Beyond color and format, meticulous attention to artwork and structural details is paramount. These technical specifications account for manufacturing tolerances, ensuring your carton assembles perfectly.
Following these guidelines helps Baili Paper Packaging achieve precise cuts and clean folds for your custom packaging.
Preparing digital files correctly is crucial for high-quality carton printing. Adhering to specific technical standards ensures your designs translate accurately from screen to physical product.
This guide outlines the key specifications for preparing your artwork, preventing common prepress errors and ensuring manufacturing compatibility.
Final Thoughts
Effective folding carton design goes far beyond visual appeal—it directly influences manufacturing efficiency, cost control, and accurate brand representation. Overlooking critical technical specifications can lead to costly production errors, reprints, and avoidable market delays.
By mastering these design and engineering principles, brands can ensure print-ready files that perform flawlessly on press and on the shelf. At Baili Paper Packaging, we work closely with brands to translate precision into tangible results—lower costs, faster time-to-market, and packaging that consistently reflects a premium, trustworthy brand image. When every millimeter matters, partnering with the right packaging expert makes all the difference.
Frequently Asked Questions
How do you make folding carton dielines?
To create production-ready folding carton dielines, first build a vector CAD template. This template defines all cut, crease, glue, bleed, and copy-safe areas, along with their specified tolerances.
Use mathematically precise vector lines, close the die outline as one continuous path, and follow defined line styles for cut, crease, or perforation.
Bleed should extend 3.2 mm (0.125″) past the knife cut. Keep live type at least 2 mm inside the dieline, maintain panel alignment within about ±0.5 mm, and apply rollover/turn-in and overlap allowances (e.g., 0.6–0.8 mm) for proper folding and closure based on board caliper.
What files are needed for printers?
For folding carton printing, the standard image resolution is 300 dpi at 100% final size. Preferred image file formats include TIFF, PSD, EPS, or high-quality JPEG.
Submit layouts as PDF/X-1a (CMYK + spots, fonts embedded, transparency flattened) or native Adobe InDesign/Illustrator files. Vector cutlines must be supplied at 1:1 scale, typically in CF2, EPS, or DXF format.
Ensure all text and critical graphics sit at least 2 mm away from cut and crease lines to avoid trimming errors during production.
How thick should lines be for folding carton print design?
For folding-carton print design, rule or line work should generally be no thinner than 0.005″ (0.13 mm) for reliable reproduction on press. This applies to both positive lines (dark lines on light background) and negative/reverse lines (light lines knocked out of a dark color).
Most folding-carton litho specifications for barcodes and fine graphics also call out a minimum printable stroke thickness of 0.004″ (0.102 mm) at the thinnest part of a character or rule. This prevents lines from filling in or breaking up on board stock. Designers should stay at or above 0.004–0.005″ (0.10–0.13 mm) line thickness to meet typical industry printability standards.
Are Pantone colors always needed for folding cartons?
Pantone (PMS) spot colors are not strictly required by any engineering or print standard for folding cartons. However, they are the de-facto industry standard when exact brand color consistency is critical, especially on kraft or non-white boards and for solid brand logos or key accents.
Without Pantone specification, printers typically default to CMYK process builds, which only approximate brand colors. Printers instruct designers that each critical brand or spot color must be defined as a Pantone spot ink using the official “Ink Book” name (e.g., “PANTONE Red 032 C”).
Many converters run 1–6 Pantone spot colors plus CMYK, with each added Pantone spot color generally increasing cost. On kraft or brown board, Pantone spot inks are often recommended for bolder, more accurate color reproduction.
Use Pantone solid coated (PMS “C”) for SBS or coated board, and Pantone uncoated (“U”) for uncoated board. Define every critical brand color as a Pantone spot in your artwork for repeatable matching across production runs.
How do you set up files for coating application?
For folding cartons, coatings are usually set up as a separate spot-color separation on its own layer, following the approved die/coating drawing. Coating shapes should be vector-only, without any tints or images, and designers should never edit them within the CMYK artwork layer.
For offset cartons, many converters do not require a separate coating file unless multiple coatings or registration-critical coatings are needed. However, in flexo and some litho workflows, a dedicated “Coating” spot color plate is mandatory for proper application.